Firmware Security: The Role of Trusted Execution in Embedded Devices
Firmware security of the embedded device is composed of different aspects. One of the secure foundation pillars that allows to drastically reduce the attack surface of the most sensitive parts of code is presented by trusted execution.
Trusted Execution Environment (TEE) is a technology allowing to run code in a deeply isolated environment. Even the OS kernel doesn’t have access to what is running inside of TEE. Thus, even illegal root access gained through unmitigated OS vulnerability doesn’t allow to gain control or even replace applications running in TEE. Normally it’s a small piece of the most sensitive code like cryptographic operations (in such applications like peer-to-peer payment, secure messaging etc.) or a copyrighted intellectual property (such as machine learning algorithms).
It is not sensible to run a whole application in TEE as it increases the attack surface on the application itself. Also, RAM dedicated to Secure World depends on a hardware platform, but normally does not exceed 64-128 MB of memory.
It is not sensible to run a whole application in TEE as it increases the attack surface on the application itself. Also, RAM dedicated to Secure World depends on a hardware platform, but normally does not exceed 64-128 MB of memory.
Applications with Trusted Execution support are organized in two parts: Rich Execution Environment (REE) and Trusted Applications (TA). Code running in TA is often referred to as enclave. Communication between unprotected (REE) and protected (TA) code is done via special API. Trusted Execution implementation differs between CPU vendors, such as ARM TrustZone and Intel SGX. They provide their own APIs, which tie TA code to a specific architecture. This problem is solved by the OpenEnclave project. It is a hardware-agnostic open source SDK for developing applications with trusted components.
Currently, TrustBox by Scalys is the only ARM device that officially supports Open Enclave SDK. TrustBox is an industrial grade confidential computing solution based on an NXP Layerscape SoC. It comes with the pre-installed Ubuntu and allows to use Open Enclave along with a full hardware hardening to create a really secure edge node.
Today we’ll demonstrate a simple enclave example which encrypts 16-bytes string using a hard-coded key.
Development environment
As a prerequisite you need to prepare your development environment (https://github.com/Scalys/openenclave-dev-guide#development-environment) or just download ready to use virtual machine with development environment from http://trustbox.scalys.com/pub/openenclave.
This tutorial uses Visual Studio Code with an OpenEnclave extension.
Open Enclave project
First, we need to create a new project:
- In Visual Studio Code press F1 and select “Open Enclave: New Open Enclave Solution” (see screenshot below)
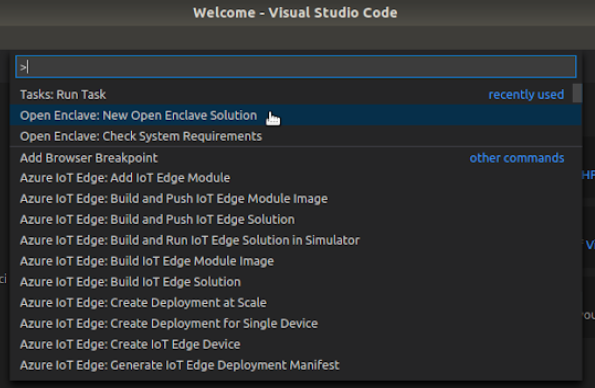
- Select the new project location
- Select enclave solution type. In this article we’re going to create a “Standalone” enclave application.
- Enter name of new project.
Now we can see the new project structure:
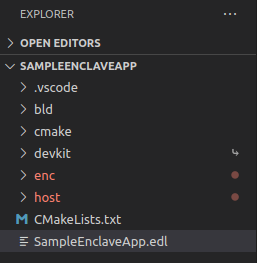
The enc directory contains the enclave itself, with configuration files. The host directory contains the host (untrusted) application.
An enclave must expose an API for untrusted code to call in (ECalls) and express what functions provided by the untrusted code are needed (OCalls). Both ECalls and OCalls are defined by developers using Enclave Definition Language (EDL), and they together consist of the enclave boundary.
An enclave’s bridge functions, both its ECALLs and OCALLs, are prototyped in its EDL file and its general structure is as follows
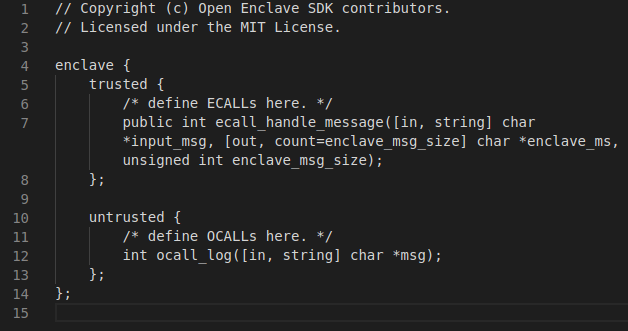
ECALLs are prototyped in the trusted section, and OCALLs are prototyped in the untrusted section.
When the project is built, the oeedger8r tool that is included with the OpenEnclave SDK parses the EDL file and generates a series of proxy functions. These proxy functions are essentially wrappers around the real functions that are prototyped in the EDL. Each ECALL and OCALL gets a pair of proxy functions: a trusted half and an untrusted half.
Your program does not call the ECALL and OCALL functions directly; it calls the proxy functions. When you make an ECALL, you call the untrusted proxy function for the ECALL, which in turn calls the trusted proxy function inside the enclave. That proxy then calls the “real” ECALL and the return value propagates back to the untrusted function. When you make an OCALL, the sequence is reversed: you call the trusted proxy function for the OCALL, which calls an untrusted proxy function outside the enclave that, in turn, invokes the “real” OCALL.
More details will be explained in the example code.
Let’s go to “host/host.c” file. We’re interested in functions create_enclave and call_enclave. Both functions are called from main.c. The create_enclave just creates an enclave and stores its handle to a global variable. Function call_enclave is the more interesting part.
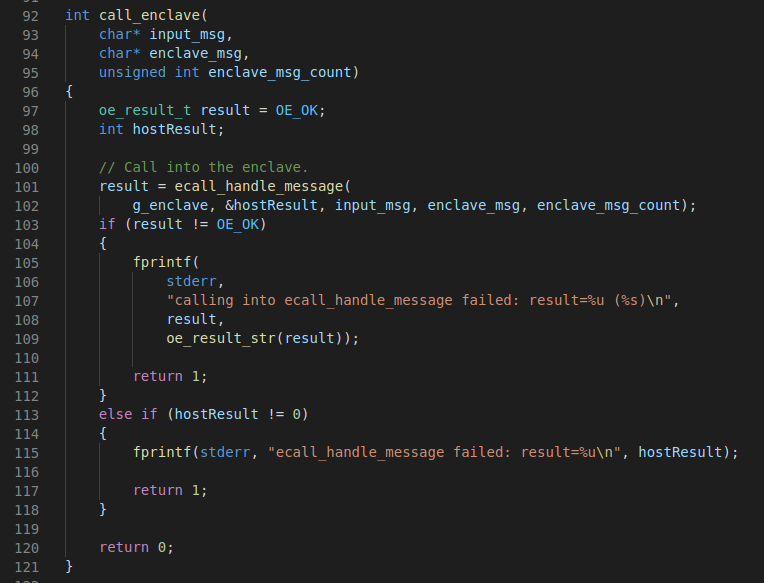
This function calls the enclave. On line 101 is an ECall which was prototyped in EDL file. But, as you can see, we call not the function directly, but proxy-functions which returns oe_result_t and return value of the original function returned to hostResult.
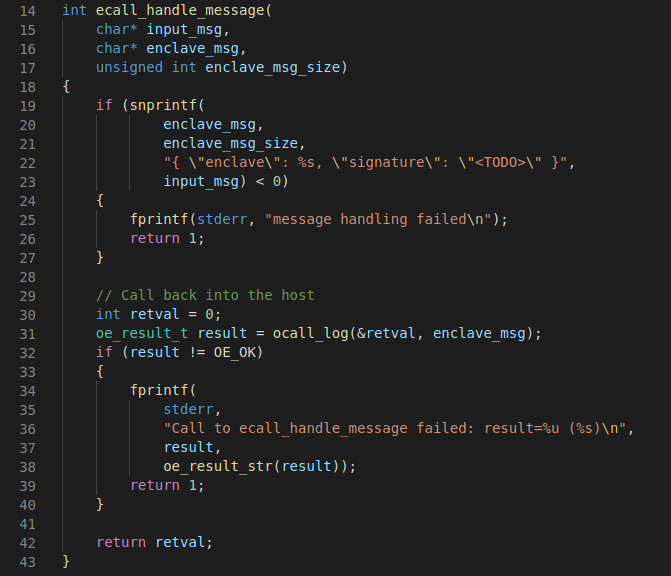
Now let’s move to the enc/enc.c file. We are interested in the function ecall_handle_message. Now this function only prints string through sprintf and logs it via ocall_log function which is OCall described in the EDL file (also, fprintf is OCall too, but it is a part of Open Enclave standard library).
Let’s make it more complicated to demonstrate usage of cryptographic functions. Open Enclave has built-in mbedTLS support.
First, let’s add a helper to print bytes array to string:
int bytes_to_hex(const unsigned char *in, size_t inlen, char *out, size_t outlen) {
    size_t end = min(inlen, (outlen - 1) / 2);
    out[end * 2 + 1] = '\0';

    for (size_t i = 0; i < end; ++i) {
        sprintf(out + i * 2, "%02X", in[i]);
    }
    return end;
}

Next, replace ecall_handle_message by the following:
int ecall_handle_message(
    char* input_msg,
    char* enclave_msg,
    unsigned int enclave_msg_size)
{
    if (strlen(input_msg) < 16) {
        fprintf(stderr, "This example supports only one AES block (16 bytes) string\n");
        return 1;
    }

    mbedtls_aes_context aes;
    unsigned char output[16];

    mbedtls_aes_init( &aes );
    mbedtls_aes_setkey_enc( &aes, key, sizeof(key) * 8);
    mbedtls_aes_crypt_ecb(&aes, MBEDTLS_AES_ENCRYPT, (const unsigned char*)input_msg, output);
    mbedtls_aes_free( &aes );

    char hex[sizeof(output) * 2 + 1];

    bytes_to_hex(output, sizeof(output), hex, sizeof(hex));

    if (snprintf(
            enclave_msg,
            enclave_msg_size,
            "{ \"string\": \"%s\", \"encrypted\": \"%s\" }",
            input_msg, hex) < 0)
    {
        fprintf(stderr, "message handling failed\n");
        return 1;
    }

    // Call back into the host
    int retval = 0;
    oe_result_t result = ocall_log(&retval, enclave_msg);
    if (result != OE_OK)
    {
        fprintf(
            stderr,
            "Call to ecall_handle_message failed: result=%u (%s)\n",
            result,
            oe_result_str(result));
        return 1;
    }

    return retval;
}
This piece of code encrypts the input message by hard-coded key using AES-ECB algorithm, transforms it to hex and prints using ocall_log.
Emulated execution and debug
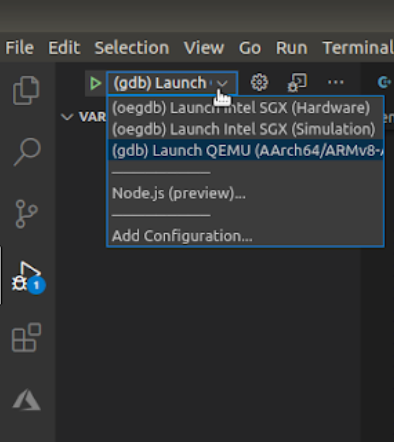
Let’s test our code through QEMU emulation. To do this you need to go to “Run” tab, select “(gdb) Launch QEMU …” and then press the green arrow.
The application will be built and started in the buildroot environment in the console. You need to login to buildroot (login: root) and start application by running
/mnt/host/bin/ExampleEnclave d5c71184-4c54-4889-8f7e-8f88561892ee
where ExampleEnclave is the name of the project and uuid is uuid of enclave which can be found in enc/enc.c file.
Now we can debug the application like any other. If we press “Continue” to skip breakpoints, we can see the result we expect.
Execution on the real device
To build and run an Open Enclave application for real TrustBox device, you need to do the following:
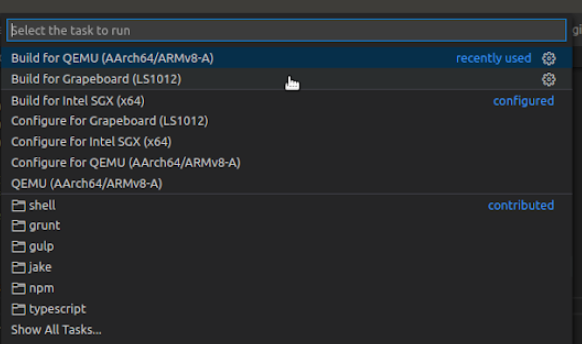
- Press F1 and select “Tasks: Run Tasks”, then select “Build for Grapeboard”
- After build is successful, build artifacts is in “bld/ls1012grapeboard/out” directory.
- To run the application on a device you need to copy the .ta file to /lib/optee_armtz directory on the device, and the binary file to any location on device where you can run it.
This example demonstrates encryption of a 16-byte string using a hard-coded key. But in real application it should be more complicated: keys should never leave enclave in unencrypted state, or hardware keys should be used. At the moment of writing Open Enclave doesn’t have a platform-independent API to access hardware keys or secure storage, but you can use OP-TEE API directly.
Next device hardening steps
The developed application demonstrated the basics of how OpenEnclave allows to protect sensitive code of your product. Next step in securing the device would be to ensure secure communication and firmware protection from the physical access based attacks, as in the world of embedded electronics and IoT Evil Maid attacks are much easier to perform while not being any less dangerous than on your own desktop system.
Interested in more details?
Contact Sintecs to ask questions and find out in details how we provide sufficient firmware security and build secure by design solutions. Sintecs is an expert in providing embedded software development services with the focus on cyber security.


